WEEKEND DIY
It never fails, every time you need to wrap a gift you find yourself sprawled out on the kitchen floor with gift wrap, bows, tape, and scissors spread out all over the place. Your legs start to cramp, the tape sticks to the gift wrap, and the scissors keep disappearing under a pile of bows. What to do?! Why not turn that unused guest room into a gift wrapping centre that will make wrapping gifts both fun and functional?
Making your own gift wrapping centre is easy and doesn’t have to take up a whole lot of space. If you don’t want to dedicate an entire room to your gift wrapping centre, try placing some of these organizational elements inside the closet or hide them behind a curtain that you can pull shut when you’re not wrapping gifts.
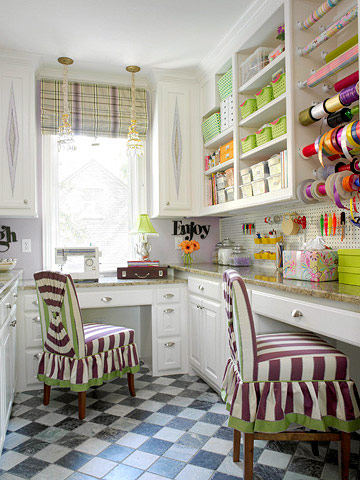
First, you’ll need a long table that’s large enough to allow you to roll out those long pieces of wrapping paper. This will make it easier to wrap larger gifts and give you room to move around without knocking everything to the floor. Add a comfortable chair with wheels and make sure you have plenty of room to move around freely.
On the wall next to the table, you’ll want to hang your wrapping paper rolls. Buy some inexpensive curtain rods, about four feet long, and curtain rod brackets. Attach the brackets to the wall, one above the other about six inches apart, fish the rods through the wrapping paper rolls, and hang them on the brackets. Stack the rods from floor to ceiling or make multiple columns about three feet high across the length of the wall. Just use scissors to cut the wrapping paper from the rolls!
You’ll want to do the exact same thing with your spools of ribbon, but just place one long curtain rod directly over your desktop for easy access. One curtain rod will hold dozens of ribbon spools and hanging them over your desktop will make it easier to pull out just enough ribbon to cover your gifts by wrapping them around the boxes before cutting the ribbon.
Install some inexpensive shelving or use bookshelf cabinets to stack photo boxes, hat boxes, baskets, or clear storage bins for keeping your bows, raffia, filling materials, or other accessories you might need. Make sure you clearly label each box or take a picture of its contents and tape it to the front so you’re not constantly opening them to find what you need. Add some larger floor baskets or bins to store packing peanuts, collapsible boxes, or stacks of flat wrapping paper.
Finally, get a plastic rolling bin with multiple shallow drawers to keep next to your gift wrapping table. Fill the drawers with scissors, tape, glitter, stickers, pens, markers, colored pencils, greeting cards, or any other gift wrapping materials you might need. Also, don’t forget to have a large trashcan nearby for throwing away scraps!

